
9 Creative Hacks to Make a Rental Feel Like Home
As a lover of interior design who is passionate about home and hospitality, my primary concern as a renter is how to make a rental feel like home.
Owning a home is considered a stereotypical part of the American dream. However, with volatile stock prices and a housing market that is slowly recovering but still uncertain, renting is a more affordable option for many, particularly those in high-cost areas.
After going from an apartment to a house rental, it’s easy to see why owning a home can be attractive, since moving is pretty much the worst. However, there are many perks to renting as well — flexibility, reduced maintenance costs, and freedom to invest in more space.
The primary obstacle to overcome as a renter is figuring out how to feel at home. Having done a lot of research on this and invested significant time in it, I’m happy to report that it is completely possible to rent and still make it feel like your own!
In this post, I’ll go over some general tips for making your space cozy, as well as nine creative hacks to make your rental feel like home.
This post contains affiliate links that earn me a commission. For more information, read my disclaimer.
General Tips for Making Your Rental Your Own
First, let’s talk about some general tips to make your space your own!
Talk to Your Landlord
First, talk to your landlord about what you’re hoping for. This is a great conversation to have before you move in, particularly if you’re looking for a longer-term living arrangement.
Having rented for a few years now and come into some…interesting…situations, I’ve come to realize that bad renters are more common than you would think. To a landlord, a renter who cares about the space, pays their bills, and takes good care of the rental is a gold mine!
I used to be nervous to ask about hanging things on the walls or making any sort of changes. Particularly if you’re renting in an apartment complex, there may be more restrictions than if you’re renting from an individual.
However, it never hurts to ask, especially before you commit to living somewhere. Having an intentional conversation with your landlord demonstrates that you’re conscientious and want to take good care of the rental.
If you want to hang things on the walls, you can offer to spackle and touch up paint when you leave. Some complexes will spackle or paint for you, but either way, it’s a good idea to understand what’s expected when you move in.
I’ve come to find that most landlords expect people to hang things, but if your landlord is extremely strict, it’s important to at least have a clear idea of the expectations upfront. Fortunately, damage-free and renter-friendly options abound, but if you have more freedom, then it will make it easier for you to make it feel like home.
Develop a Unified Color Scheme
If you’ve read some of my other posts on interior design, you’re probably aware how passionate I am about developing a unified color scheme. This is key to any sort of decor, but when you’re renting, you need to be aware of the existing colors in your home that you can’t change.

For example, if the flooring or walls are warm-toned, but you have cool-toned furniture and decor, that could be problematic. Although you could change your furniture and decor in that scenario, it would be expensive, as well as a huge hassle.
Generally, rental spaces are pretty neutral, and your colors don’t have to go perfectly. But I recommend finding a rental space that doesn’t directly clash with any of your existing decor. If it complements it, that’s even better.
For example, our color scheme is white and gold, and it works best with warm tones. Fortunately for us, our rental uses beige, cream, and white colors for the flooring, walls, and cabinets/shelving, which complements our color scheme well.
Once you have found a rental space that works for you, keep your furniture and decor as cohesive as possible. Typically, a unified color scheme is present in an owned home, as homeowners have the freedom to paint and redo flooring, as well as match their furniture and decor to the space.
By keeping your furniture and decor aligned with a color scheme that blends with the existing rental, you’ll give the illusion that you’ve lived there forever, and it will feel like home.
Shop Thrift/Discount Stores
Generally, moving to a new rental requires getting rid of old furniture and decor and acquiring new. Shopping at discount stores like Ross, HomeGoods, and TJ Maxx is a great way to save money and find what you need. Goodwill or other thrift stores are also excellent places to find deals.
However, when shopping at thrift and discount stores, you have to be patient. You likely won’t find the exact thing you’re looking for the first time you go, and it’s easy to be tempted by something that is a great deal but not exactly what you want.
Stay strong and don’t cave because of the discount! Just be patient and keep checking, and at some point, it will pay off.
9 Hacks to Make Your Rental Feel Like Home
Now that I’ve covered a few general tips, I’ll share nine different hacks to make your rental feel like home!
1. Install Curtains
Particularly if you have a lot of windows, curtains can make a huge impact on your space. Again, having a unified color scheme is essential to making your rental feel like home, and curtains are one of the most effective ways you can help establish this.

When we moved into our current place, the existing curtains were dark-colored, and the rods were silver-toned. Swapping them out (after checking with our landlord) for cream-colored curtains with gold rods made a world of difference.


Tips for Hanging Curtains
Although I recommend hanging curtains, it is not a task for the faint of heart. Follow these tips to learn from our mistakes!
Prepare for conflict
I heard recently from a friend that hanging curtains is the biggest test of a marriage, and after hanging 5+ sets of curtains in the last month, I’m pretty sure that’s true!
Hanging curtains will cause conflict for multiple reasons:
- It requires a minimum of two people — it cannot be done alone (unless you’re more talented than we will ever be).
- It is extremely difficult to hang them straight/at the exact right length — more on that later.
- It requires subjective opinions as to what looks best.
- It isn’t a quick job.
So, when you bring multiple people with different opinions into a very frustrating scenario that takes a while and likely won’t turn out exactly perfect, it’s a recipe for discord. Whether it’s with your partner, roommate, a family member, or a friend, here are some ideas for navigating this natural conflict:
- Find curtain rods that are easy to install (we loved ours) and use all the same kind, so you don’t have to figure out different installation methods.
- Set a goal of one set per day or week rather than trying to knock them all out at once.
- Intersperse more fun household tasks or activities with curtain-hanging.
- Allow plenty of time — at least one or two hours, and don’t do it when you have a hard deadline (e.g., right before people come over or you need to leave).
Fit them into your budget
Curtains are a decent investment, but they are worth it! Depending on how many windows you have, you may be able to spend more or less. Just prioritize accordingly and fit them into your budget.
To save money, we found our curtain rods and curtains on Amazon. If you can spend more, stores such as West Elm, Pottery Barn, or Crate & Barrel have beautiful options.
Figure out the amount of light/privacy you want
When selecting your curtains, it’s important to identify your desired balance of light and privacy. Curtains can let in a wide range of light, from sheer or light-filtering to full blackout. Your needs for this may vary depending on the room — for example, you may want blackout curtains for your bedroom but light-filtering curtains for a window looking into your backyard.
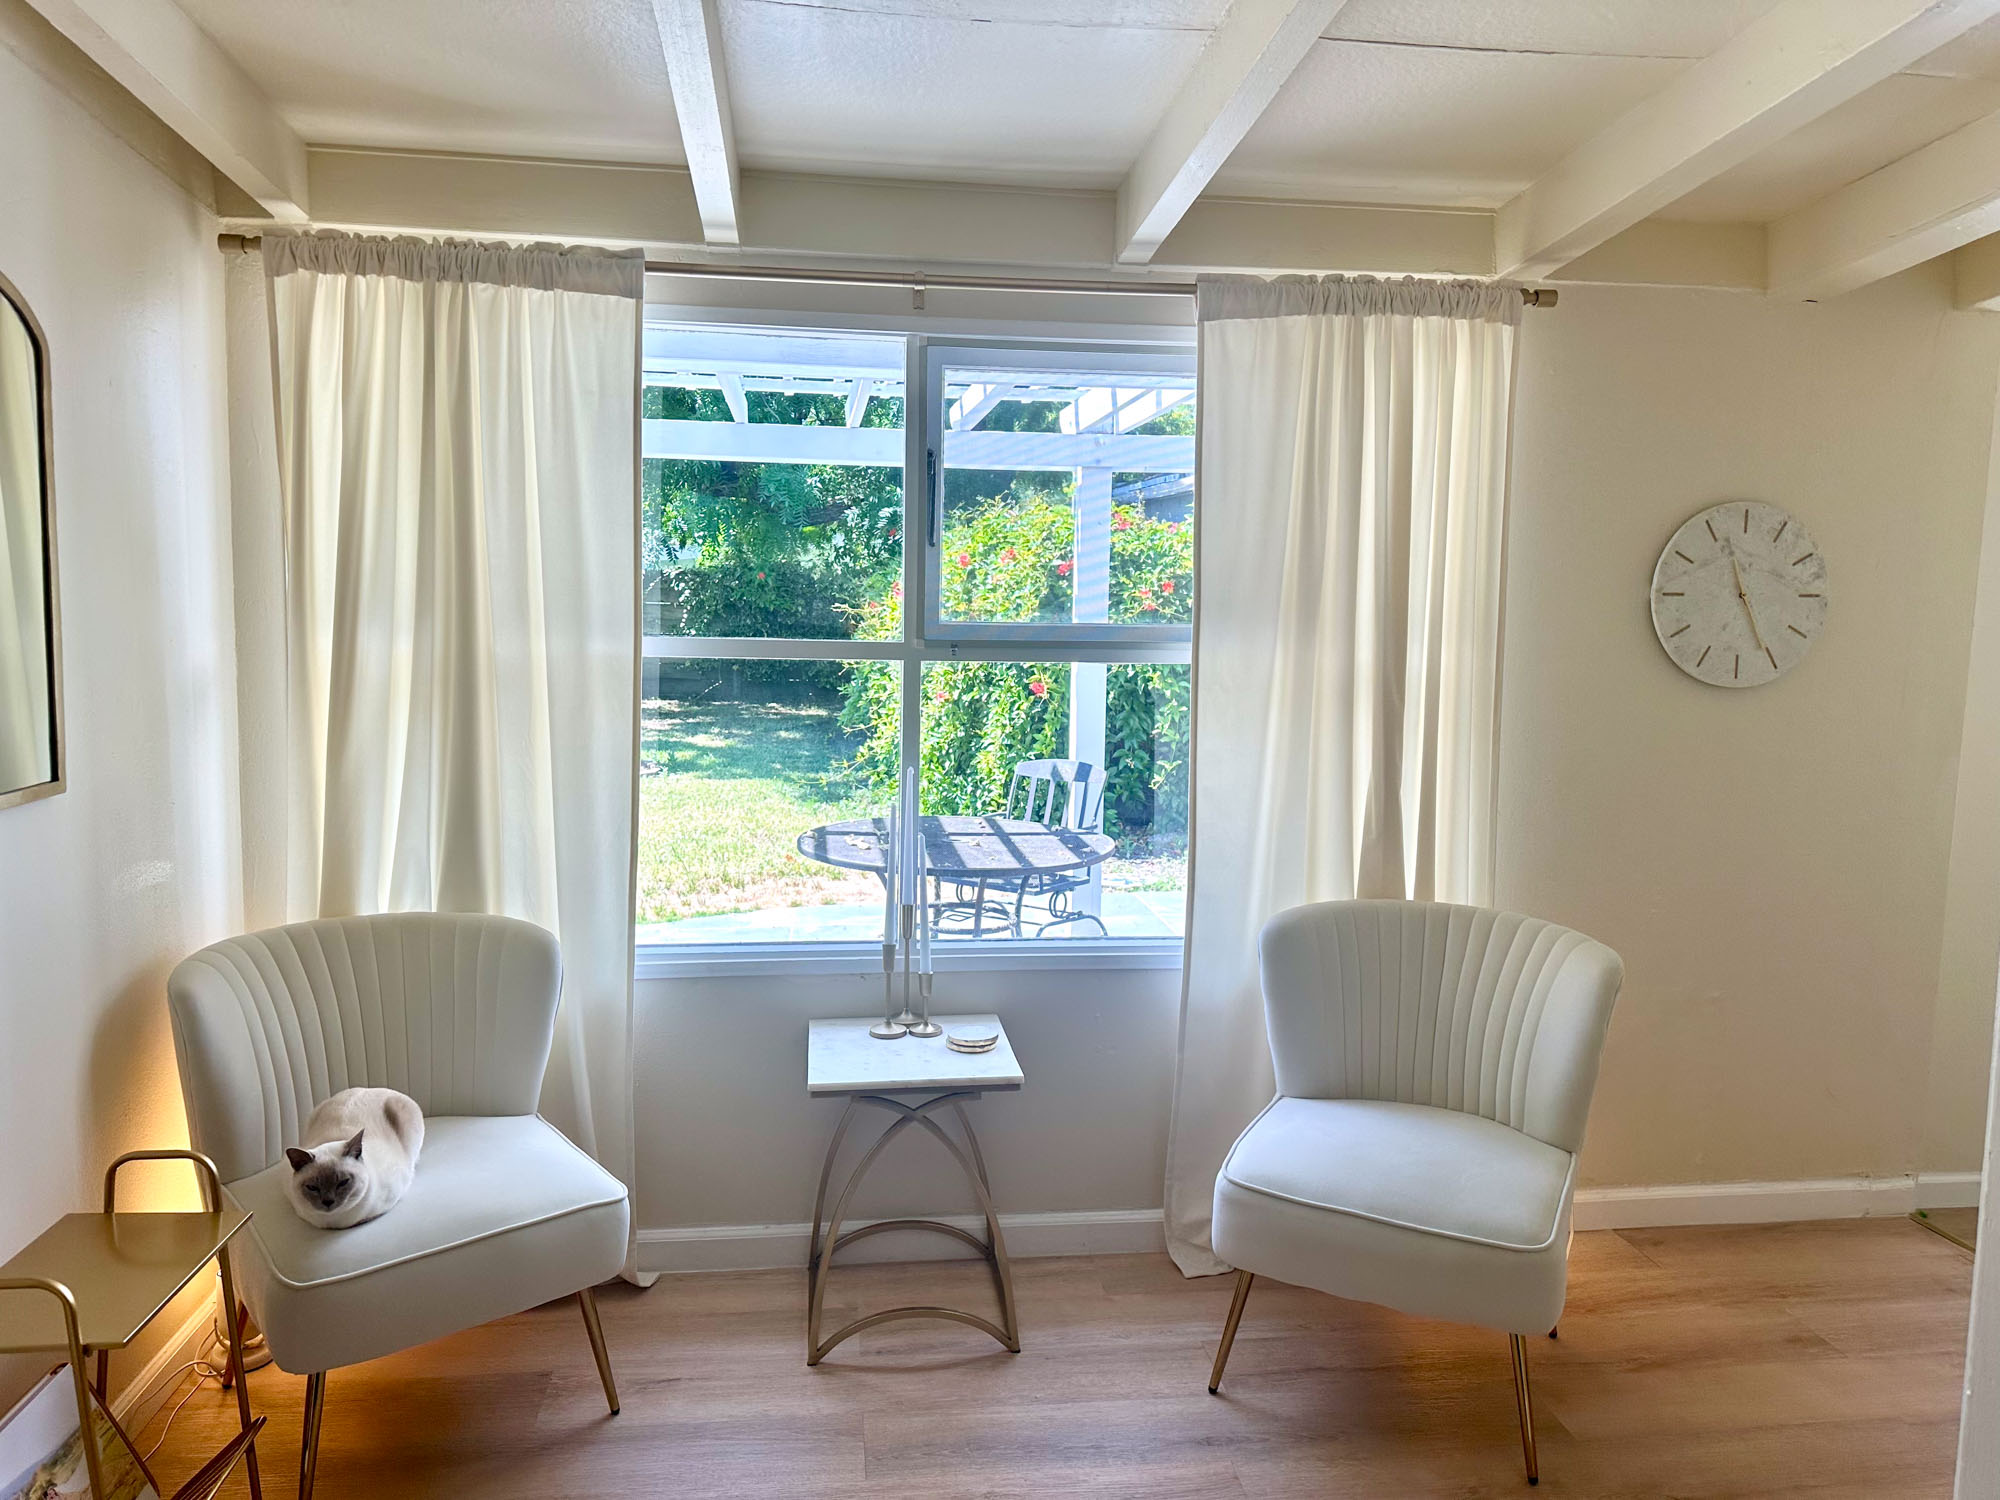
In addition, consider that lighter-colored curtains will visually brighten a space and darker-colored curtains will darken it. We selected our ivory velvet curtains, which are technically close to blackout level but still let in some light, and chose to use them for all rooms to keep the look cohesive.
Whatever curtains you choose, ensure that they align with your chosen color scheme.
Choose a hanging method
Again, it’s important to verify this with your landlord. If drilling isn’t an option, there are damage-free choices available, such as these drill-free rods!
However, I recommend drilling if you’re able to, as you have more options and it’s more secure.
You may need to use drywall anchors if you aren’t drilling into wood. Our curtain rods came with these, and they aren’t difficult to use. Just be prepared to remove them and spackle/paint whenever you leave.
Some drywall anchors cause more damage than others, so it’s important to be aware of what you’re getting yourself into.

Invest in a laser level
Since getting the curtains level is the most difficult part of hanging them, a laser level is an absolute game-changer. Once you drill the holes for one side, use the laser level to determine the appropriate height on the other side.
Identify the correct hanging height and length of your curtains
Speaking of the correct height for curtains, this is the most difficult part of it all. I spent countless hours researching this and discovered a couple of key principles:
- While the correct length for hanging curtains is a personal choice, too long is better than too short. Some people choose to have them puddle on the ground, but ideally, if you don’t puddle them, they should be just barely brushing the floor. This is very difficult to accomplish, so my recommendation when in doubt is to err on the side of slightly longer. Also, keep in mind that curtains, when spread out, are a tad shorter than when they are gathered.
- Hanging your curtain rods a few inches higher and further out on either side of your windows makes your ceilings look higher, and your windows look bigger. Depending on the height of your ceilings, you may need longer curtains (standard are 84″). We used a mixture of 84″ and 92″, depending on the ceiling height. It’s up to you exactly how high to hang them, but hitting somewhere in the middle of the top of your window and your ceiling is a good goal.

Figure out how many panels you need
Another key consideration when hanging curtains is to determine how many panels you need. While common sense might seem to indicate that a 96″ window only needs two 48″ panels, aesthetically speaking, you will likely want more, depending on how full you want your curtains to appear.
Ask yourself whether the curtains will generally remain open or closed. If they are generally open, fewer panels are fine. But if you envision them being closed for privacy or prefer the luxurious look of more panels, you will probably want to invest in more.
Pro tip: Don’t forget that you need an even number of curtain panels, or the curtains will look lopsided when opened. This will likely put you in the position of needing to decide if you want too few panels or too many. Only you can make that call, but I prefer the look of more curtains.

Although curtains were the heaviest lift for us, they were absolutely worth it. If you want to make your space more homey, consider giving curtains a chance!
2. Use Area Rugs
Fortunately, the second hack I’m going to share — using area rugs —is a much more straightforward way to add personality to your home. Particularly if you have hardwood floors, rugs are a key element in making your space cozy.

You can add rugs to a variety of places in your home, including:
- Living Room
- Bedrooms
- Entryways
- Hallways
- Kitchen
- Bathrooms
- Patio
When choosing rugs, be sure to find options that complement your color scheme! We splurged on our living room rug from Pottery Barn, but Amazon and Rugs USA have great budget choices.


3. Strategically Place Furniture
Another key way to make your rental feel like home is to strategically place your furniture. This will likely require moving some things around, and you may need to get rid of some furniture pieces and buy new ones.
Identifying pieces you already have that go well in certain areas of the home will make the placement look intentional.
For example, we had a tall bookcase in our last apartment. We had specifically bought it for a unique space that was both narrow in width and quite deep, and I had originally planned on putting it in our family room in our new house, since I didn’t have a better idea for where it would go.
However, we discovered an awkward gap in our breakfast nook in our new house, and tried putting the bookcase there to fill it. Even though I hadn’t pictured it going there, it looks like it was made for the space.

Being creative and open to putting your furniture in different places can help make your rental feel like a space you designed, rather than somewhere you just moved into.
Although it’s great to utilize your existing furniture, you will likely need at least some new furniture. Be very intentional with anything you purchase by checking dimensions. Since you’re specifically buying it for this space, take advantage of that and find furniture pieces that fit in the exact spot you’re looking to fill.
For example, the drink table we had in our last apartment was too small for its location in our new house. I was able to flip it on Marketplace and buy a larger one at Ross, and so I essentially broke even.


You can also use furniture to hide outlets, cords, or anything ugly. In our current rental, there are some cables/holes in our living room wall, but we were able to place chairs and a side table with some decor in front of them so that these eyesores are not noticeable!


4. Prioritize Lighting
Lighting is absolutely critical for making a space feel homey. Fortunately, there are some really easy ways you can adjust lighting as a renter.
Light Bulbs
The easiest (and cheapest) way to improve your lighting is to swap out cold-toned light bulbs for warm-toned lighting. You can see the difference between the temperatures in our chandelier when I swapped out one of the bulbs. Although it seems like such a small thing, ambience is everything!
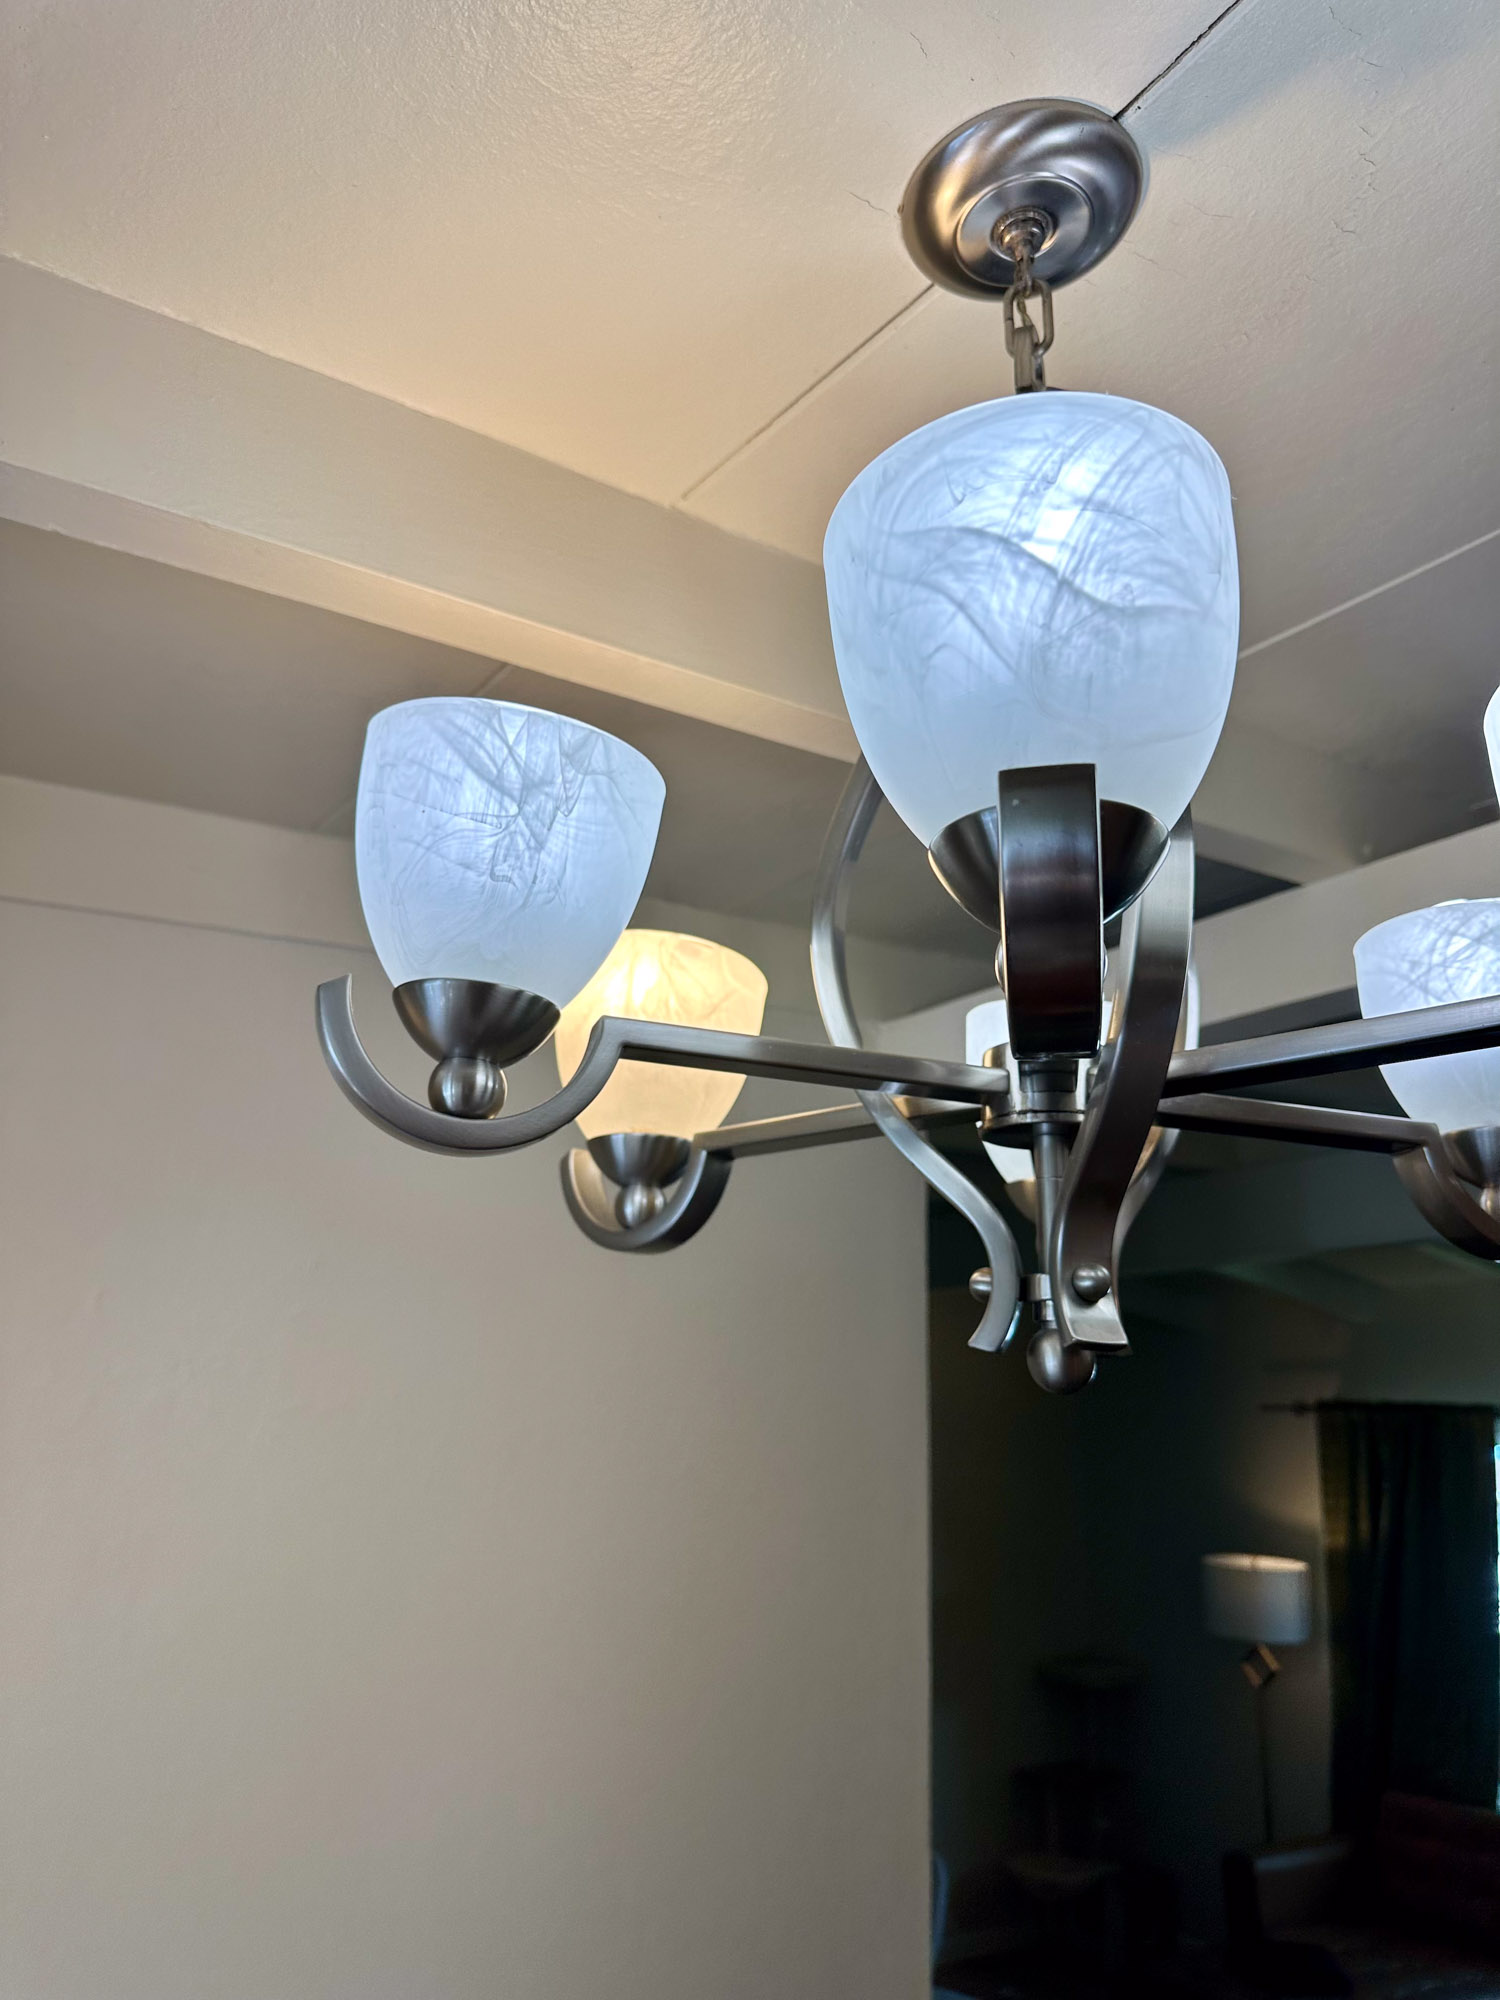

While some fixtures may be more difficult to change out or not allow you to swap out the bulbs, there should be at least a few places you can add some warm light to your house. I like these warm-toned light bulbs on Amazon.
Light Fixtures
Although a bit more challenging (and potentially hazardous), with your landlord’s permission, you can also swap out light fixtures.
The biggest obstacle is that electricity is a safety concern. Be sure to turn the power completely off before touching anything, and purchase a voltage tester to double-check that it’s off. Once you have that element figured out, swapping a light fixture is surprisingly not that hard — and it makes a big difference!


There are lots of tutorials available online, including this one-minute video. However, light fixtures can vary, and if you come across something that you don’t recognize or you’re uncomfortable installing it yourself, by all means, contact an electrician.
While light fixtures can get expensive, there are great budget options available. We found the one we replaced in our bathroom on Amazon. Don’t forget to add warm-toned bulbs!
Additional Lighting
In addition to light bulbs and light fixtures, there are many options for other types of lighting available. When possible, avoid using harsh overhead lighting, even if your rental has it installed.
Capitalizing on natural light, lamps, uplights, downlights, candles, and twinkle lights is a great way to make your home feel cozy.

For more details about using this type of lighting to create a warm and welcoming space, check out my post on ambient lighting.
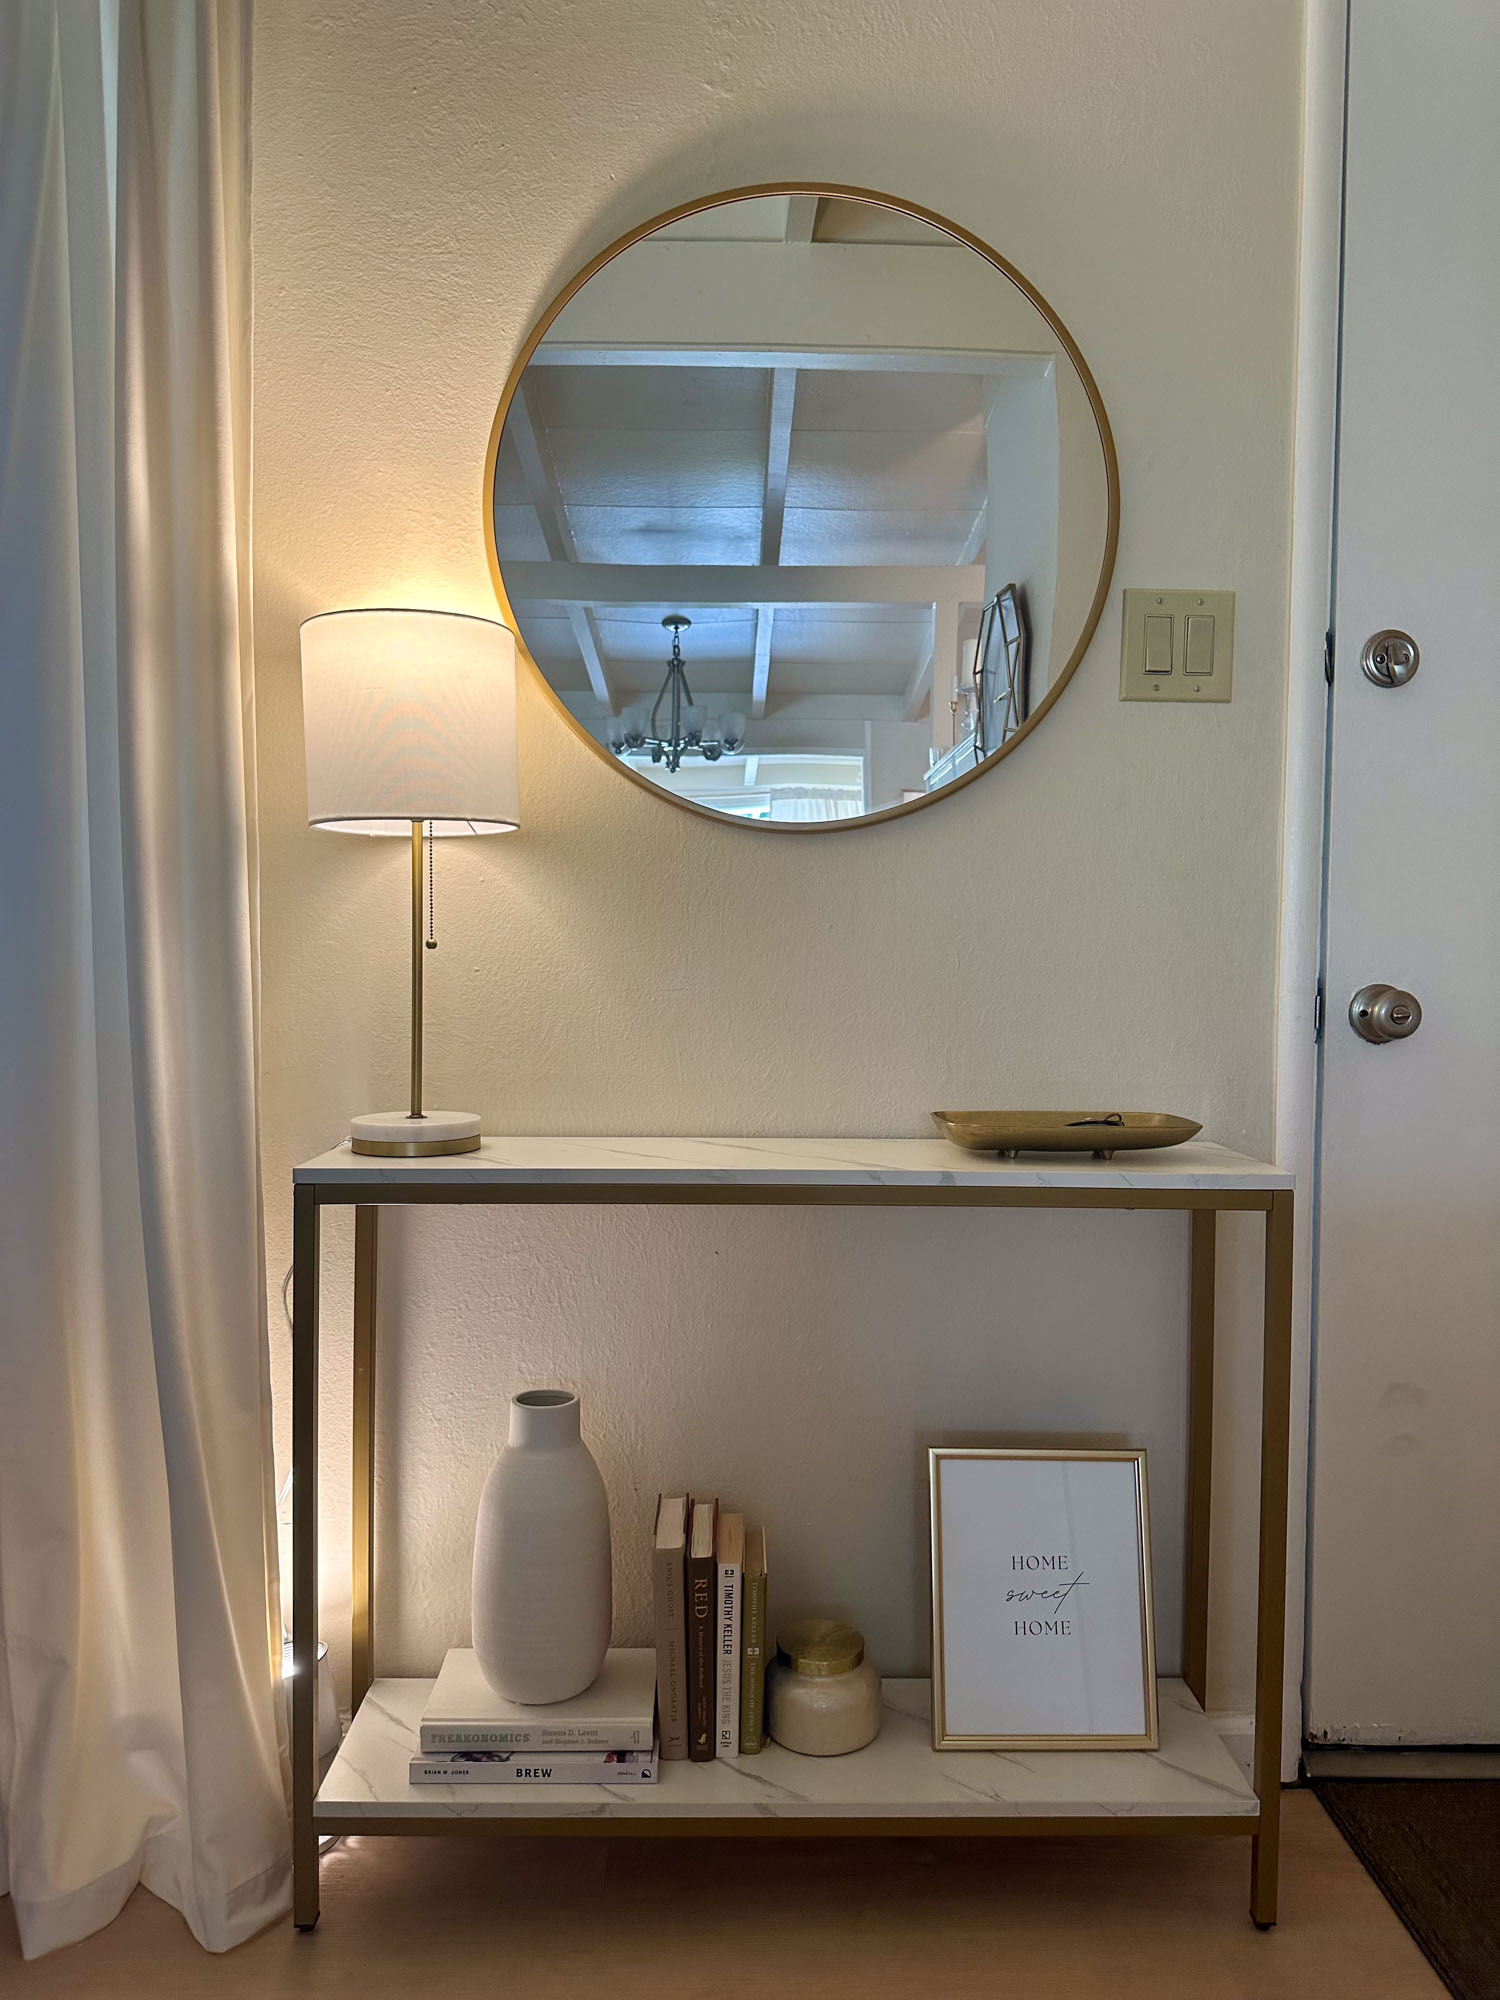
5. Hang Mirrors
My next hack for making your rental feel like home is to hang as many mirrors as possible. Mirrors are critical in magnifying light in a space. They also make any room look bigger. Win-win!

However, when you’re renting, hanging mirrors can be intimidating, and if hung incorrectly, they pose a safety hazard. If you’re able to drill, you’ll have more options for securely hanging mirrors. But there are also other options that are easier to install and are renter-friendly.
Lightweight Mirrors
Especially if you’re not able to drill, try to find small, lightweight mirrors. The bonus is that these tend to be cheaper as well. For mirrors that are only a couple of pounds, you can hang them on a nail or picture hanger, particularly if you can hang them in a stud vs. drywall.

Standing Mirrors
Another damage-free option is a standing mirror. The downside is that these do take up floor space, but they look very elegant and are a great decor statement piece.
Over-the-Door Mirrors
Over-the-door mirrors are another way to get around drilling, and are very convenient to have in a bedroom or bathroom. Just be sure to check the clearance between the top of your door and the doorframe, as not all over-the-door mirrors work for all doors.
Large Wall Mirrors
While I’m a fan of any kind of mirror, my favorite is a large wall mirror. If you’re able to drill, I recommend installing at least one of these in your home! It’s a little intimidating at first, but once you get the hang of it, it’s a lot less stressful.

Some tips for hanging large mirrors:
- For heavy mirrors, use screws — not nails.
- Use a laser level if you’re hanging from two points to ensure the mirror is level (lessons learned from the curtains!).
- Try to drill in studs.
- If you can’t drill in studs, use drywall anchors that are rated for the correct weight of the mirror. While drywall anchors may or may not be necessary for curtains, with a mirror, if you’re not in a stud, they are a requirement.
Hanging mirrors is a bit of a hassle, but after having done a bunch of mirrors and curtains, we’ve concluded that mirrors are the easier job! And they really brighten a space and make it feel like home.

6. Add a Gallery Wall
I love a good gallery wall, and they can be quite renter-friendly. I have a bunch of lightweight frames with our wedding photos that I used in our last apartment, along with a clock and a small mirror.
Using photos is a great way to add a personal touch to your home, and a gallery wall can make your decor appear extra intentional and coordinated.

Making a gallery wall is actually pretty easy! Just measure the size of your wall and then place your frames/decor on the ground and arrange them within those size parameters.
You generally want to allow 1-2 inches between frames/objects. It usually takes me a few iterations, and I take pictures of each one, until I find the one I like best. Then, I transfer it to the wall.


Although I didn’t have a good place to recreate our entire original wall in our new house, I was able to repurpose a few of the frames for a different wall. So, if you’re looking for a long-term investment as a renter, a gallery wall can morph to take different shapes based on your needs.

7. Swap Out Hardware
One of the simplest ways to transform your rental is to swap out the hardware! This change is so easy to make (and reverse) that you don’t even need to check with your landlord.
Find knobs, drawer pulls, etc., around your rental and swap them out with ones that align with your chosen color scheme. I found these cabinet handles/drawer knobs on Amazon.

Another one of my favorite hacks is swapping out the hardware on our own furniture. It’s an inexpensive way to instantly upgrade your furniture, and when all of your hardware matches, both on your furniture and in your rental, it really makes it feel like you designed the space.

8. Style Your Shelves
Shelves are one of the homiest features, because they’re both decorative and functional. Nothing says “I live here” like having dishes and personal items displayed!

Our house has a lot of open shelving in the kitchen, which can be challenging to fill but is also a lot of fun. If your rental has existing shelving, definitely utilize that!
Our kitchen had a hanging spice rack already installed, so I finally took the plunge and got some white and gold spice jars. Most satisfying investment ever!

If you’re looking for additional shelves to use as storage and decor, you can acquire more shelving via furniture units, such as bookcases or china cabinets. IKEA has a lot of great and inexpensive options. Floating shelves can also be a good solution, depending on your ability to drill.
Tips for Styling Your Shelves
When styling your shelves, one helpful principle is to follow the “zigzag” technique. It doesn’t have to be precise, but generally, your eye should gradually follow a zigzag pattern along your shelves.


This pattern can be accomplished with color, shape, height, or texture. It helps ensure continuity and keeps the eye engaged.


Another trick when styling your shelves is to create depth with your decor, which adds visual interest. Placing items at varying depths and layering decor is a good way to accomplish this.
Things to Put on Your Shelves
When considering things to put on your shelves, you may need to get a bit creative.
Books
Books are perhaps the most obvious, as well as most underrated, decorative item for shelves. I’ve found tons of great decorative books at Goodwill — the key is to remove the sleeves, and often you’ll find a beautiful hardcover book underneath. Try to find books that align with your color scheme to make your decor look extra intentional.
Although the decorative function of books is important, as a book lover, I also like to try to use books that I enjoy reading or plan to read when possible. It makes your decor more meaningful when you use books that have personal significance!

When styling books, use bookends or decorative objects to anchor them in clusters, or alone as a statement. You can place the bookends/objects next to the books or on top of them. Be sure to place the books both vertically and horizontally to add visual interest.

Dishes/Glassware
Particularly in your kitchen or dining room, dishes and glassware are both a practical and beautiful way to dress up your shelves. I like to display my prettiest dishes and intersperse vases and cookbooks. If your dishes align with your overall color scheme, that’s even better!


Candles/Candlesticks
I’m a big fan of candles, and both candles and candlesticks can be great decorative objects.

Framed Photos/Designs
Again, photos add a personal touch to your home, and using a combination of framed photos and designs is a very polished way to style your shelves. Don’t forget to layer your frames!

Personal Items/Knick-Knacks
Sometimes you need to think outside the box when it comes to decor. If you have any personal items or knick-knacks lying around, those can be effective pieces to add to your shelves.
Just be sure they align with your color scheme. For example, we have a Polaroid that we use as part of our decor. Since it’s white, it ties in perfectly!

Vases/Planters
You can use vases and planters, empty or full, as decorative objects.

Decorative Bowls/Baskets/Boxes
Particularly if you have fewer “pretty” things that you need to store, decorative bowls, baskets, and boxes can be a great way to hide those in plain sight.
9. Incorporate Plants & Flowers
My last hack for making a space feel like home is to add plants and flowers. There’s just something about living things that really makes a place feel cozy.
You can use real or artificial plants, including my personal favorite — air plants — to decorate your rental.

Bud vases with cut flowers or greenery are another one of my favorite ways to brighten a room. It may seem like a small thing, but a splash of color and plant life adds a lot and is quite affordable.

Although renting comes with its challenges, there are a lot of benefits as well. With a little time, investment, and creativity, you can make your space feel like your own.
More Renter-Friendly Design Ideas
Once you’ve tackled the basics of making a rental feel like home, these simple upgrades can take your space even further.


Peel & Stick Wallpaper Mistakes
Learn from our mistakes and get our best tips for installing peel-and-stick wallpaper.

Ambient Lighting Ideas
Add warmth and personality to your space with renter-friendly ambient lighting ideas (no drilling required).