
How to Make Clear Ice Cubes for Cocktails, Parties, & More
If you’ve ever been served a drink with a gorgeous, crystal clear ice cube at a bar or restaurant, you’ve probably wondered if it’s possible to replicate this effect yourself.
After conducting a series of lengthy experiments, I am happy to report that it is absolutely possible to make clear ice yourself! In this post, I’ll explore some common misconceptions about clear ice, dive into a few different methods, and walk you through my recommended steps to make clear ice cubes at home. I’ll also address how to store and serve your cubes, share creative ways to level up your ice, and go over some frequently asked questions.
This post contains affiliate links that earn me a commission. For more information, read my disclaimer.
Why Clear Ice Is Worth It
In addition to its showstopping beauty, clear ice serves a functional purpose — it melts more slowly than cloudy ice, which dilutes your beverage less and keeps it cold for longer.
It might seem counterintuitive, but dilution is actually a very important part of the science of cocktails. Adding the right amount of water — without adding too much — is what will take your drinks to the next level. This is particularly important with shaken drinks. Once you’ve achieved the level of dilution that you want, using clear ice cubes is a good way to reduce further dilution while keeping your drinks as cold as possible.
But even if it weren’t functional, clear ice is so pretty that I think it’s worth it for that reason alone.

Common Misconceptions About Clear Ice
After a great deal of research and testing, I found there are two primary misconceptions about clear ice.
1. Misconception: Using Ultra-Purified or Distilled Water Makes a Difference
Reality: The type of water you use matters far less than you might think.
When I first set out to create clear ice cubes, I found a few resources telling me to use filtered or distilled water — but in practice, it made almost no difference.
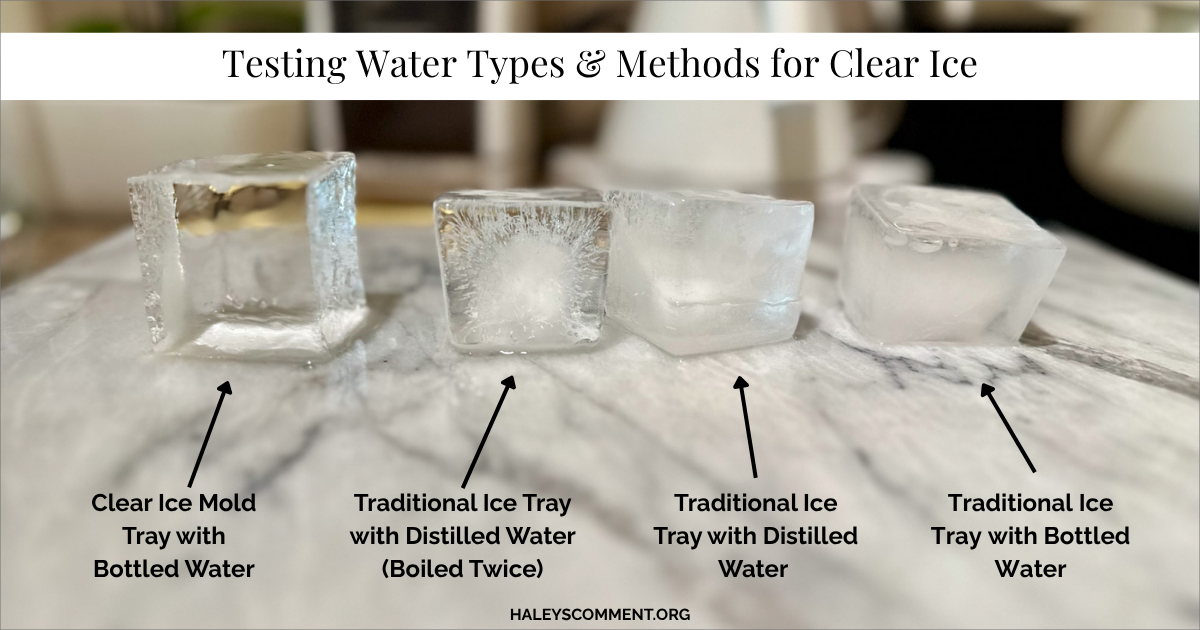
Although the type of water may help very slightly with cloudiness, the water itself made very little difference in my tests. It had the largest impact when using traditional ice cube trays (as opposed to clear ice molds, which I’ll get into later). However, when using traditional trays, the ice was still far from clear.
What we’ll unpack later in this post is that the freezing method — not the type of water — is what matters the most.
2. Misconception: Boiling Water Makes Clear Ice
Reality: Boiling water might help slightly, but the results will be minimal.
Many of the sources I found suggested I boil the water and let it cool completely — twice — before freezing. I tested this with both regular molds and clear ice molds (again, more on those later).
Boiling water and letting it cool multiple times is extremely inconvenient and time-consuming, and it still doesn’t solve the problem. Plus, you lose water through evaporation. While I noticed a slight difference when using regular molds, it wasn’t enough to make it worth it. Even then, the ice was still far from clear. The difference when using clear ice molds was completely negligible.
The freezing method — not the water or whether you boil it — is the biggest factor in your ice’s clarity.
Other Variables that Can Matter
- Water Temperature
- Supposedly, warmer water will give you clearer ice because it freezes more slowly. However, in my tests with warm and cool water, I didn’t see a major difference.
- Opening and Closing Your Freezer
- Opening and closing your freezer can disrupt your ice as it freezes and make it less clear. My question is this: Who can afford not to open their freezer for 24-36 hours? I certainly can’t, so I didn’t test this. However, I was still able to achieve pretty clear ice despite opening my freezer occasionally. But keep in mind that the less you open your freezer, the clearer your ice will be.
- Freezer Temperature
- Again, ice will be clearer if it freezes more slowly. You can control this somewhat with your freezing method, but changing the freezer’s temperature is the only other variable I didn’t test. If you’re like me and have a freezer full of food and can’t afford to mess around with the temperature, you can still get reasonably clear ice with a colder freezer, as long as you use the right method. But ideally, the warmest setting (as long as it’s still below freezing) will give you the clearest ice.
- Fullness of Freezer
- Along the same lines, how full your freezer is will dictate how steadily the temperature is maintained. A fuller freezer is supposedly able to maintain a cooler, steadier temperature, but I made clear ice with a freezer of varying fullness and didn’t notice any major differences.
- Leaving Water to Sit Out Before Freezing
- Another pointer I found was that leaving your water out for 30 minutes or so before freezing it helps the water settle and remove air bubbles. I tried this, and if there was a difference, it was negligible.
All in all, the freezing method (that we’ll get into next) is the biggest factor for clarity.
How to Make Clear Ice Cubes at Home
So now that we’ve gone over some of the misconceptions and variables surrounding clear ice, let’s talk about how to make clear ice cubes at home.
Did you know that ice freezes top down? It has to do with how water’s density responds to falling temperatures. In a normal freezer, ice freezes from the coldest side inward — usually that’s the top and sides, which results in an ice cube with a cloudy center. However, by insulating all sides except the top, you force the ice to freeze top-down, which pushes air bubbles and impurities downward.
Because of this principle, Camper English was the first person to harness the power of what is now known as directional freezing.
There are several different ways you can harness directional freezing to make clear ice cubes at home.
1. Cooler Method
The original method for making clear ice cubes at home is the one that Camper English employed back in 2009. By filling a large cooler with water and leaving it uncovered, English was able to create a block of ice that was crystal clear at the top, forcing all the impurities to the bottom.
However, this approach doesn’t technically give you ice cubes, just a large block of ice. While you technically can carve blocks into cubes with an ice pick or saw, it’s tricky to get them uniform.
I don’t know who has the time or skill to carve perfectly even ice cubes out of a giant ice block, but I certainly don’t. So this method was immediately off the table for me.
2. Clear Ice Maker Machine Method
The second option I investigated was purchasing a clear ice maker machine. These machines also employ directional freezing but require no skill or effort apart from adding water. I didn’t test any of these machines, though. In addition to being very expensive, to me, the counter space footprint of one of these devices is too much to ask (ifykyk).
Although this method might be a good solution for those who have the budget and space for it, I wanted to find a more cost-effective way to make clear ice cubes at home.
3. Clear Ice Maker Mold Method
The third and final way to make clear ice cubes is by using a clear ice maker mold. After weeks of research and testing, I believe this method is the cheapest and simplest way to use directional freezing for clear ice. You probably will not achieve perfect results, but it’s the most effective way to get reasonably clear ice.
To make clear ice, I used the TINANA clear ice mold from Amazon. This mold allows you to make eight two-inch cubes at a time, which is helpful if you need to create clear ice in larger quantities. I purchased two molds which allowed me to both create even more cubes as well as test different variables side by side. There is also a version that produces two-inch spheres, although I didn’t test that option.
This mold is very affordable, and is made of five pieces:
- An outer Styrofoam insulation layer
- An outer silicone layer that holds all of the water you are freezing, including the ice block at the bottom
- A hard plastic layer that holds the ice cubes
- An inner silicone tray that holds the ice cubes
- A lid

Step-by-Step Guide to Using a TINANA Clear Ice Maker Mold
Now, I’ll go through a step-by-step guide to using the TINANA clear ice maker mold to get crystal clear cubes at home!
1. Clean Mold Thoroughly
Using warm water and soap, clean all pieces of the mold (except for the Styrofoam layer) thoroughly. This is particularly important if you are reusing the mold, as there will be mineral buildup from the water.
I learned this the hard way after only rinsing the molds and getting significantly less clear cubes on my third or fourth tries. You can see the buildup in these pictures.


Once you’ve washed the mold, you can dry it if you like, just be careful not to get towel fuzz or lint inside your mold. If you do, just rinse with water. Any impurities could mess up your ice cubes.
2. Assemble the Mold & Add Water
Next, assemble the mold completely (apart from the lid, of course). In one of my trials, I made the mistake of assembling the inner three layers, filling them with water, and then placing them in the outer Styrofoam insulation layer — the result? Water everywhere — I added more water than would fit in the insulation layer.
Once the mold is fully assembled, add water. As mentioned previously, the type of water does not matter nearly as much as the freezing method, but I would recommend regular bottled water, or purified tap water if that’s all you have.
When using clear ice molds, distilled water actually produced some of the worst results in my experiments. I’m not sure if that was a fluke or if it’s because distilled water is so pure that it is more impacted by impurities.
Either way, I experienced the best results with bottled water, followed by purified tap water.

Since water expands when it freezes, leave a little room at the top of the mold (~¼” or ⅛”). However, the amount of water won’t make a huge difference in your clear ice results — I tested it with varying amounts of fullness, and there was no noticeable impact.
After you’ve added the water, you can place the lid on top. It won’t be perfectly snug, as there needs to be room for the water to expand when it freezes, but it should feel secure enough to prevent impurities from getting inside.
3. Freeze
Place your mold in the freezer. Theoretically, the less you open your freezer, the better. However, as someone who cooks a lot and doesn’t have the luxury of not opening my freezer, I was still able to produce clear ice.
Your ice will take around 24-36 hours to freeze, depending on the temperature of your freezer and how full it is. Based on my tests, I believe that it’s better to remove the mold earlier in the time frame, around the 24- or 30-hour mark, before the bottom ice block has completely frozen solid. The ice cubes that I removed later in the process (around 48 hours) were not only less clear but also were much more difficult to remove from the mold.
However, your cubes themselves need to be completely frozen, so don’t pull them too early. Since ice freezes top down, you can be reasonably confident that if at least part of the ice block is frozen near the top of the block (bottom of your cubes) that your ice is ready.
4. Temper
Once you remove the ice from the freezer, it’s important to temper it. This will prevent cracking and can remove any frost or freezer burn. To temper your ice, simply allow your ice mold to sit at room temperature for around five to ten minutes. This will both ensure the quality of your ice and make it easier to remove the cubes from the mold.
You may notice frost on top of the ice cubes due to some air exposure, which is perfectly fine. You can scrape it off with a knife (my preferred method) or rinse it off later after you have removed the cubes from the mold.

One interesting note: although I tested filling the tray with different amounts of water, there was always one cube that ended up slightly taller than the others. I’m still unsure why this was the case, but it’s possible it’s because that cavity was the last to freeze. Regardless of the reason, it didn’t majorly impact the clarity!
5. Remove the Styrofoam Insulation Layer
The first step after tempering the ice is to remove the Styrofoam insulation layer. This part is usually not difficult. If I’m not sure that the ice cubes are ready, I’ll do this step first to determine whether the block is mostly frozen and the cubes are ready.

6. Remove the Outer Silicone Layer
After removing the insulation layer, you will also need to remove the outer silicone layer. You will likely have to “peel” this off the mold, especially toward the bottom where it surrounds the large ice block.

WARNING: Do this step over the sink. If the ice block is not completely frozen solid (which I recommend aiming for), there will likely be some water that spills out of the mold.

The ice block will be full of impurities/streaks — that’s good! It means the directional freezing has worked, and the air has gone into the block, not your cubes.
7. Soak the Ice Block in Cold Water
Next, you need to remove the ice block that is attached to the bottom of the rest of your mold by soaking it in cold water. You can also use running water. Just be careful not to soak the mold where the ice cubes themselves are, as the water can crack or melt them, even if it’s cold.

This can take around five to ten minutes and is the most tedious part. If you’re impatient like me, you can gently tap the edges of the ice block on the edge of your sink and chip pieces of it away. Just be cautious, or you risk cracking your cubes.

8. Remove the Hard Plastic Shell
Once you’ve gotten rid of the ice block, pull the inner silicone layer out of the hard plastic shell. This part can also be a little tricky. You’re likely to get some thin ice that forms on the outside of the plastic shell and between it and the inner silicone layer, which can make it difficult to remove.

Tempering the ice will help with this. If you’re able to get leverage by lifting up the edges of the silicone layer, you should be able to pry them apart.
9. Pop Out Ice Cubes
The final step is to pop out the cubes from the silicone tray. Be careful doing this. You can use a knife to remove any remaining ice that’s on the outside of the tray (if it’s frozen solid, you can gently tap it with the handle of the knife to break/scrape it).

You’ll notice little circular plugs at the bottom of each cube — removing those plugs may help you pop out the cubes, but it’s not strictly necessary. Do not twist the tray, but invert it and then apply pressure to the bottom and sides to push out each cube.
After you’ve removed the cubes from the mold, there will likely be a few plugs that are still attached. They should be fairly easy to slice off with a knife.
And just like that, you’ve got clear ice!


Note: You’ll see that these cubes aren’t 100% perfect, and some still have a few streaks within. After making well over one hundred cubes (probably close to two hundred), I did manage to get a couple that were nearly flawless — but on a larger scale, achieving total perfection every single time just isn’t realistic.
Confession: As someone with OCD, I hate it when things aren’t perfect. But I’ve been trying to learn not to let perfect be the enemy of the good.

Even with slight imperfections, your clear ice will still look impressive and absolutely stunning in any glass. Just remember: the occasional tiny streak is barely noticeable to anyone but you.
Storing & Serving Clear Ice
As you’ve seen, making clear ice isn’t too difficult, but it is a bit of a process. Once you’re done making the cubes, you don’t want to accidentally ruin them, so you need to be careful with how you store and serve them.
Store in Individual Bags in the Freezer
If you’re not serving your ice immediately, I recommend storing each cube in an individual Ziploc sandwich bag to prevent them from sticking to each other. Then, put the individual Ziplocs in a larger freezer Ziploc bag to protect them from freezer burn. Although this is a little tedious, I did test it, and if you store them all in one bag, they will likely stick to each other.

Temper Your Ice Cubes Before Serving
Once you remove the cubes from the freezer, you will need to temper your ice cubes again by leaving them out for five to ten minutes at room temperature before adding them to drinks. Otherwise, your cubes will crack, even if the drink is cold (speaking from experience).
Serve in an Insulated Ice Bucket
If you aren’t adding the cubes to drinks immediately but want them to be ready to serve, place them in an insulated ice bucket and provide tongs for handling.
Ways to Level Up Your Ice Cubes
Clear ice is gorgeous on its own, but there are a couple of different ways you can take your cubes to the next level if you’re looking to experiment. If you want to make your clear ice even more impressive, try these optional enhancements!
Use an Ice Stamp
Using an ice stamp is a fun — and surprisingly easy — way to elevate your clear ice.
To stamp ice, you don’t need heat — all you need is a stamp made of metal, since metals are highly efficient thermal conductors. Copper and aluminum are some of the most efficient and cost-effective conductors, but I got a Lotus ice stamp on Amazon that is made of brass, and it works very well.

Once you’ve tempered your cube to prevent cracking, press down firmly with the stamp for around 10-15 seconds and then release. After stamping, use tongs to tip the cube over and dump the water that was created by the ice melting. If you’re stamping multiple cubes, it may help you to run the stamp under cold water in between cubes (don’t use warm water or you can crack the ice).


If possible, stamp your cubes right before serving. Once the cube refreezes, it won’t look quite as good as when it’s freshly stamped, particularly if the freshly melted water refreezes against the cube, which is hard to avoid. However, if you need to stamp your cubes in advance, you can — just ensure they have some time to temper (yet again) before serving. You may notice a slight decrease in quality each time you refreeze, but they will still be pretty, especially after they temper.

Add Fruit, Herbs, & Edible Flowers
Adding fruit, herbs, and edible flowers to your cubes is another special way to enhance your ice. I actually featured some of these enhanced cubes in my July 4th charcuterie post — they’re an easy way to make any meal or gathering feel polished.
When adding fruit and herbs, you just need to consider the flavors of whatever beverage you’re serving, since eventually the ice will melt and then the flavor will translate to your drink.


For example, I wouldn’t put a cube with pomegranate arils in just any cocktail, but I would add it to a pomegranate-flavored drink or a neutral beverage like sparkling water or even champagne.


Edible flowers are a beautiful way to add some color to your cubes without changing the flavor of your drink. Select colors that complement/contrast your beverage to take it to the next level.


One final thing to consider: By introducing these edible elements into your cubes, you are also introducing impurities. During my tests, the ice cubes with fruit, herbs, and flowers in them had the most streaks/air bubbles. Some of them even produced a dramatic “sea urchin” effect. This effect looks like spiky bubbles radiating out from the center — it happens when air gets trapped around your add-ins.

Being diligent about washing your molds thoroughly will help minimize this, as well as using smaller amounts of add-ins. However, the result is pretty enough that even if these additions somewhat cloud your ice, they may be worth it.
FAQs for Clear Ice Cubes
Troubleshooting your clear ice, or have questions about how to make it? You’re in the right place, thanks to my (many) failed experiments. See answers to frequently asked questions below.
Clear Ice Quality Concerns
Troubleshooting your ice? Jump to:
- Why do I have frost on top of my cubes?
- Why did my cubes crack?
- Why are there cloudy areas/spikes/air bubbles in my cubes?
- Why are there “sea urchin” shapes in my cubes?
Why do I have frost on top of my cubes?
Frost naturally occurs when ice is exposed to air, and it’s pretty difficult to avoid. You may have noticed that the lid on your ice cube tray is not airtight — that’s because water expands when it freezes, and so it’s important to leave room for that to happen.
Good news: frost will not negatively impact your cubes! I had frost on every single cube I made. You can either scrape it off with a knife right away (my personal preference) or run the cubes under cold water (after the cubes have tempered).
Why did my cubes crack?
There are a variety of reasons your cubes can crack, but the two most likely factors are 1) failing to temper them properly and 2) dropping them or striking them.
Tempering is so important to prevent cracking. After you remove your cubes from the freezer, leave them out for at least 5-10 minutes before you bring them into contact with liquids. Even then, proceed with caution. Don’t let warm liquids touch your cubes. Room temperature beverages can work, but cold are better.
Why are there cloudy areas/spikes/air bubbles in my cubes?
It’s really difficult to determine the cause of some of these imperfections, especially when they’re minor, but generally, these are a result of impurities in the water/on your trays or when the directional freezing doesn’t work correctly, and air gets trapped.
In my tests, I debunked a few misconceptions around what will help (the type of water and whether it’s boiled), among other things. Based on my experience, I think that the two biggest culprits for impurities are 1) the mineral buildup from water on your trays and 2) leaving your cubes to freeze for too long.
Thoroughly scrubbing your trays with hot water and soap in between, and checking your cubes on the earlier side (24-30 hours) is the best way to set yourself up for success. Apart from that, most of the variables in my trials didn’t make a huge difference. You could try playing around with the two factors that I didn’t test: lowering the temperature of your freezer and minimizing opening and closing it.
Even my best cubes had some minor flaws, and I don’t think expecting perfection is realistic.
Why are there “sea urchin” shapes in my cubes?
As I mentioned just above, it’s difficult to know why there are impurities or imperfections in your cubes, especially when they’re minor. Although some of the variables I mentioned in the question above might be at play, a dramatic “sea urchin” shape usually means there’s something bigger at play, but you can probably fix it.
In my experiments, the times I noticed sea urchin shapes in my cubes were 1) when I added fruit/herbs/flowers into my cubes and 2) when I used distilled water. Scrubbing the trays with hot water and soap, using smaller amounts of add-ins, and switching to bottled water helped me see the biggest improvement overall.
Questions about Making Clear Ice
Process questions? Jump to:
- Does the kind of water I use matter?
- Does boiling water make a difference in cube clarity?
- How long should I freeze my cubes in the clear ice mold?
- Why do I need to clean my ice cube mold so thoroughly?
- How do I store my cubes once they’re done?
Does the kind of water I use matter?
Not really. Using directional freezing is by far the most important factor in achieving clear ice. That said, using distilled water surprisingly produced the worst results in my experiments. I recommend using bottled water or filtered tap water if that’s all you have.
Does boiling water make a difference in cube clarity?
No, not if you’re using a clear ice mold. Although boiling water showed a slight improvement over non-boiled water with a traditional mold, the ice was still far from clear. In my tests using boiled vs. non-boiled water with the clear ice mold, the difference was negligible. Save time and don’t boil your water!
How long should I freeze my cubes in the clear ice mold?
While it may vary based on your freezer temperature and fullness, around 24-30 hours is usually the right length of time. Removing the mold before the brick at the bottom has totally frozen solid is ideal for achieving the clearest ice and ensuring ease of removal.
Why do I need to clean my ice cube mold so thoroughly?
One of the most important discoveries that I made during the course of my experiments was that the mineral buildup from water or any other impurities on the mold can really impact the clarity of your ice. Scrubbing your molds thoroughly with hot water and soap is critical to ensuring clear cubes.
How do I store my cubes once they’re done?
Store in individual small Ziploc bags to prevent sticking, placed in a larger freezer Ziploc bag, to ensure best results. Trust me, your future self will thank you.
And that’s a wrap on my tips for making clear ice cubes! If you’ve also conducted extensive cube experiments, I’d love to hear your secrets. Cheers to science (and pretty drinks!).
